Check here the answers to some of the most Frequently Asked Questions about teaching with Brightspace.
- How do merge course sections?
- How do I copy content from my course migrated from Blackboard to my empty, Fall course shell?
- How do I make my course active?
- How do I delete a grade book item?
- How do I add pronouns to my profile?
- How do I use the Attendance tool?
- How do I make sure my content is meeting accessibility criteria?
Merge Course Sections – This request must be submitted in TruView.
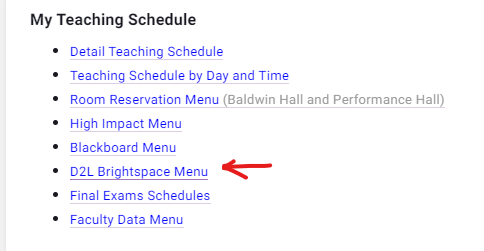
Start by logging-in to TruView –> Scroll down to Faculty –> Faculty Tools (in the left-hand menu).
On the right, you will see several sections of options. Select “D2L Brightspace Menu” from the “My Teaching Schedule” section


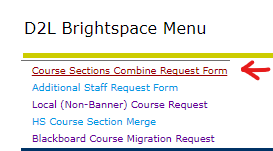
In the D2L Brightspace Menu, select the “Course Sections Combine Request Form” to merge sections or courses together into one new course.
When the form opens, select the term and follow the on-screen instructions. It may take a 1-3 days for the merge request to process.
Copy Course Content – This process takes place in Brightspace.
From within the target course (i.e. your empty Fall23 course shell) you are going to choose to “Copy Components from another Org Unit” and then choose the source course to copy from.
- Log-in to Brightspace;
- Enter the target course;
- Locate the purple menu ribbon at the top;
- Choose “Course Admin”;
- Select “Import / Export / Copy Components” and then follow the on-screen prompts.
- When the process completes, review your content to clean up any issues of formatting, date alignment, or release conditions.
See additional details about importing, exporting, and copying components into your course on the Brightspace Documentation Site.
Activate a Course – each term, after building your course, you will need to make the course “active” in order for students to see it when they log-in to Brightspace.
- Log-in to Brightspace
- Enter the course to activate
- Click “Course Admin” in the purple Nav Bar
- Click “Course Offering Information”
- Scroll down to the check box for “Active”, select that and click “Save”
Deleting a Grade Book Item
In order to delete a grade item from your course, it first needs to be disassociated with the quiz, discussion, or assignment that it was connected to. To do this, follow these steps:
- In the “Grade Book” section of a course, look at the “Association” column in the “Manage Grades” tab
- Check to see what category the Grade Book item is associated with, then navigate to that category’s section on the Navbar
- Locate the associated assignment, quiz, discussion
- Select the dropdown menu next to the item
- Select “Edit Assignment”
- Choose the dropdown option “In Grade Book”
- Select “Not in Grade Book”
- Select the “Save and Close” button
After the grade item has been disassociated, it can now be deleted. To do so, navigate to your Grade Book and find the Manage Grades tab. Then, click More Actions, and Delete. Now, you can use the boxes on the left side of the grade item to select the ones you’d like to delete.
Adding Pronouns to Profile
Students and instructors have the ability to display their preferred pronouns on Brightspace. These can be seen in places like the Classlist and Discussion sections of a course. If someone wants to add their pronouns to their profile, navigate to your profile in the top right corner inside Brightspace. Under Account Settings, check the box labeled “Allow others to see my pronouns” and select “Use different pronouns.” Set your preferred pronouns, then Save and Close.
Emailing Class List
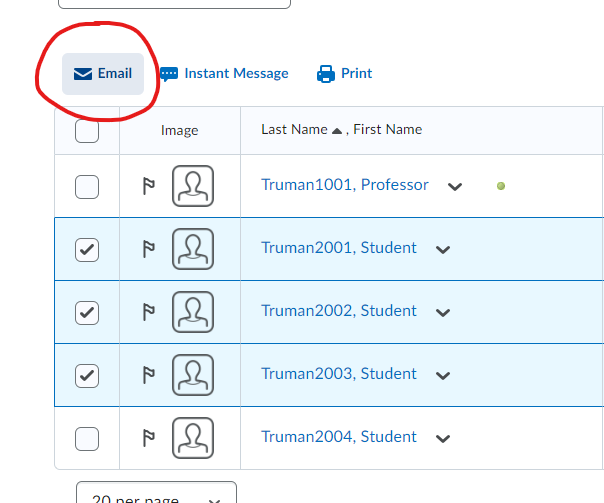
On Brightspace, there are many ways to send an email to an entire class list. Selecting the “Email Classlist” element under the ‘Classlist” page will allow an instructor to write and send out an email to all their students enrolled in a given course.
Alternatively, an instructor can select the box next to a student’s name to email a specific group of students:

How can I use the Attendance tool?
The Attendance tool in Brightspace addresses critical functions for assessing class participation in a given course. This gives instructors the chance to view participation data for all of their students: how many classes they’ve attended, how many they’ve missed, and a total attendance percentage. There is also a “cause for concern” threshold that can be set at a certain percentage. When a student falls below the threshold, an alert status will be viewable on their Attendance percentage column. This makes it simple for an instructor to be aware of students who are falling behind on participation.

If a student falls below the cause for concern threshold, their score in the % Attendance column will be displayed in red. Currently, there is no automatic graded section for Attendance, though an assignment can be made to manually enter the attendance percentage for each student.
Using the Accessibility Checker
Making course content accessible is a necessity for instructors to make delivery of material as smooth as possible for all of their students. Truman employs a service that was previously used in Blackboard, called Ally, that is used as an accessibility checker for content that an instructor displays or uploads on their Brightspace course. Ally has not yet been added to Brightspace, but in the meantime, Brightspace has its own built-in accessibility checker that can be used until Ally becomes active.
There are a few steps you can take to ensure that your course content is accessible for all students. Here are a few tips:
- Avoid using tables or columns when organizing content
- Use headings to show connections between sections. Headings can make navigating a page easier by categorizing content in a clear structure.
- Group items in numerical or bulleted lists. Formatting your lists in the correct way is crucial for readers to properly navigate your content. A numerical list indicates that information will be displayed in a sequential order, while a bulleted list shows that every point is equally important.
- Use a table of contents for longer topics, and have headings link back to the table of contents.